Share this blog:
Blockchain & decentralized ledger technology is powerful, but requires that all information used in smart contracts either lives in a transaction or in the ledger state. This means off-chain data is not accessible to on-chain logic.
For example, if I want to create a contract that does simple logic based on different exchange prices, there is no way to know or access those values within my contract. An oracle contract can create a request queue, and send my contract the data I need to operate on-chain logic.
Off-chain data is possible with:
- Chainlink — A network that provides reliable tamper-proof inputs and outputs for complex smart contracts on any blockchain.
- Amberdata — A data provider enabling access to the full breadth of blockchain data and multi-exchange market data.
TLDR; Chainlink is powerful, Amberdata provides full blockchain and market context, these use cases are just the tip of the iceberg for emerging smart contract possibilities!
Today, we’re going to deep-dive into how to use several examples to accomplish tasks with chainlink and amberdata.
Outline:
- Setup
- Remix IDE
- Using A Data Provider — Amberdata
-
Requesting Data
- Functions
- Remix Settings
- Using Oracle & Job Ids
- Explorer
- Checking Data
- Helper functions
- Going further
Setup Development Wallet
Before you can develop smart contracts or interact with Oracles in Ethereum you need to setup a few things. We will be using Metamask, adding test ETH and LINK token. We’re going to work through a few setup steps that are necessary for using Chainlink, a reference guide can also be seen here: Example Walkthrough.
1. Install Metamask
We won’t be using mainnet today, however you should still install with security in mind, do not throw away or publish your private keys or phrases! Once you have metamask installed, click the network dropdown and switch to “Ropsten Test Network”. We will primarily be using Ropsten.
2. Get Ropsten test Ether from the Ropsten Faucet
Click your Ropsten address to copy it from metamask. Paste your address in the faucet input, then click “Send me Test Ether”. Wait approximately 15 seconds and you will have 1 ETH in your account.
3. Get LINK Tokens from the Ropsten LINK Faucet
Use your same ropsten address as in the previous step, and paste into the input. Confirm you are not a robot, you’re not a robot… right? Click “Send me 100 Test Link”, and within ~15 seconds the transaction will confirm. You’re not quite done yet!
4. Add LINK token to metamask:
A. In order to see your LINK token balance in Metamask, you will need to add the token.
B. In Metamask click the hamburger menu button on the left, and click on Add Token and then Custom Token.
C. On Ropsten the LINK token address is: 0x20fE562d797A42Dcb3399062AE9546cd06f63280.
Copy that address, then paste the token contract address into MetaMask in the Token Address input. The token symbol and decimals of precision will auto-populate. Click Next.
D. A new window will appear, showing the LINK token details. Click Add Tokens.
E. You’re all set!
For other test networks, there are other faucets. Obtaining test Ether is as easy as above. Here are some helpful links for other networks:
- Ropsten LINK Faucet
- Ropsten ETH Faucet
- Ropsten LINK Token Address: 0x20fE562d797A42Dcb3399062AE9546cd06f63280
- Kovan LINK Faucet
- Kovan ETH Faucet
- Kovan LINK Token Address: 0xa36085F69e2889c224210F603D836748e7dC0088
- Rinkeby LINK Faucet
- Rinkeby ETH Faucet
- Rinkeby LINK Token Address: 0x01BE23585060835E02B77ef475b0Cc51aA1e0709
Setup Remix
Now we’re ready to start building our smart contract! We’ll be using remix to test the functionality, and do simple operations:
- Go to Remix (Note: We’re using solidity version 0.4.24, for compatibility with ChainlinkClient.sol)
- Start a file for ChainlinkTest.sol — Click the “Plus” button in the top left of remix. Name the file ChainlinkTest.sol
You now have a blank slate, we need to add the ChainlinkClient solidity code to add all the features needed to talk to the Oracle providers. The easiest way to do this (for now) is to copy & paste the following file into remix:
- Go here ChainlinkClient.sol Code and copy the whole file
- Paste into remix, you will use all logic in the same file.
Why did we just paste a large file into a single solidity file? For testing in remix, we’ve found that there have been compile issues using linked file setup, causing memory issues or not finishing compile. This is not the case in truffle or embark, so we will just be using this setup for remix.
Using A Data Provider — Amberdata
We’re ready for the fun part! Using real world data in your project is greatly simplified using Chainlink, we just need to ask for it within our contract. Let’s cover a couple key concepts before diving into code.
Understanding the workflow
It’s important to know the exact flow of execution needed before building applications with oracle logic. All contracts must use the following order of operations before they can use off-chain requested values:
1. Load Contract with LINK tokens
Every time you deploy a new contract, it needs LINK token to pay for requests. This is as simple as copying the contract address, sending LINK tokens with metamask.
2. Request data
Sending a transaction to the contract’s “request” style function will trigger a chainlink request to an outside data provider. This goes into a queue to be fulfilled once the data provider returns the requested data.
3. Wait for transactions to clear
Once a request has been made, fulfilled data will take several blocks to complete before it is available in your contract.
4. View & Use received data
Upon transaction completion, it’s now available to any logic triggered upon the fulfillment callback.
Requesting Data
There are several ways to request data. We’re going to look at several examples, however there are many other ways not documented here. The first example starts with market data for token prices.
Example 1: Price Contract
For Price, we’re going to store the value returned as a public variable.
contract AmberdataPriceBasic { uint256 public currentTokenPrice;}Add Request Function
Important pieces needed:
- Oracle Address — The address of the contract responsible for returning the requested data
- Job ID — The unique identifier for each type of job, based on the type of value expected to be returned. Full docs here
-
Token Address — The address of the token price to be requested
function requestTokenPrice(address _oracle, bytes32 _jobId, string memory _tokenAddress) public onlyOwner { Chainlink.Request memory req = buildChainlinkRequest(_jobId, address(this), this.fulfillTokenPrice.selector); // Configure the url to token prices req.add(“extPath”, concat(“market/tokens/prices/”, _tokenAddress, “/latest”)); // Configure the pointer to the exact data location // this will be the value submitted on fulfillment req.add(“path”, “payload.0.priceUSD”); // Since the price is in decimal format // needs a minor change for solidity to handle correctly req.addInt(“times”, 100); sendChainlinkRequestTo(_oracle, req, ORACLE_PAYMENT); }// Small helper function to help construct function concat(string memory a, string memory b, string memory c) private pure returns (string memory) { return string(abi.encodePacked(a, b, c)); }
Add Fulfillment Function
function fulfillTokenPrice(bytes32 _requestId, uint256 _price) public recordChainlinkFulfillment(_requestId) { // Simply store the returned value for use or access later currentTokenPrice = _price; }View a completed code sample here →
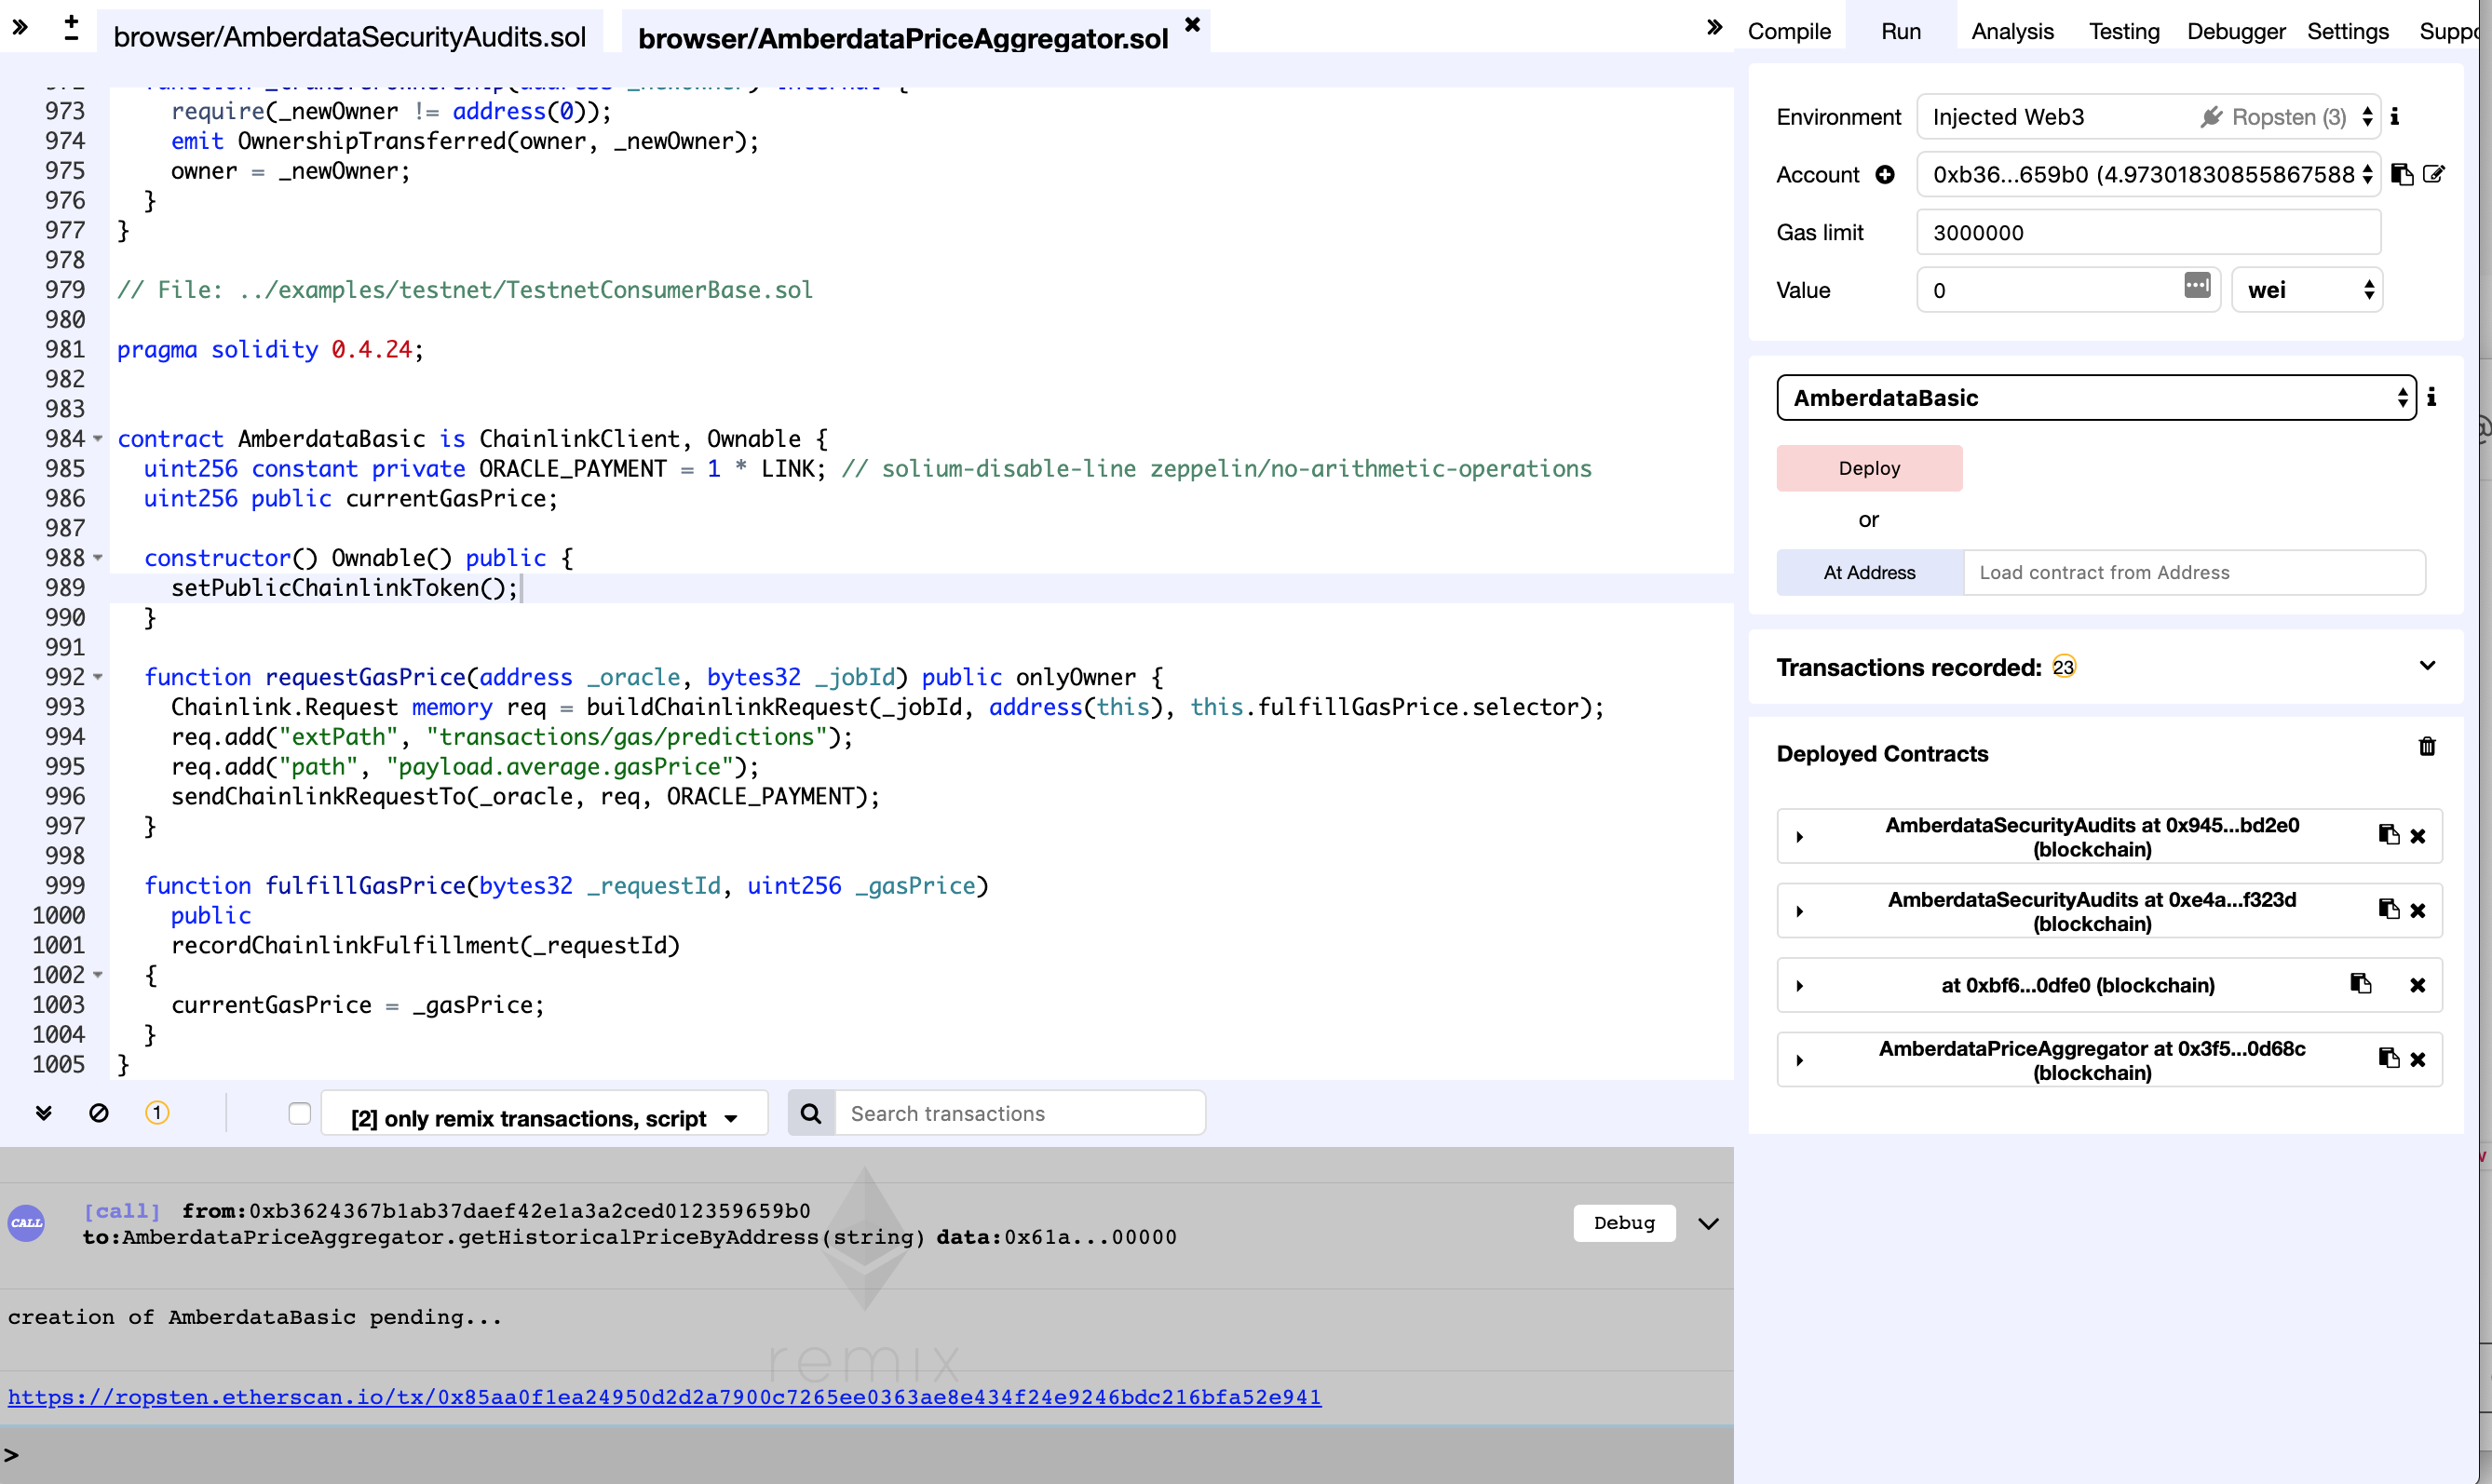
Example 2: Gas price oracle
Similar to the first example, we can request different fields from other endpoints. As you can see there’s not much changed, but the data possibilities are endless.
uint256 public currentGasPrice;function requestGasPrice(address _oracle, bytes32 _jobId) public onlyOwner { Chainlink.Request memory req = buildChainlinkRequest(_jobId, address(this), this.fulfillGasPrice.selector); req.add(“extPath”, “transactions/gas/predictions”); req.add(“path”, “payload.average.gasPrice”); sendChainlinkRequestTo(_oracle, req, ORACLE_PAYMENT); }function fulfillGasPrice(bytes32 _requestId, uint256 _gasPrice) public recordChainlinkFulfillment(_requestId) { currentGasPrice = _gasPrice; }View a completed code sample here →
Example 3: Storing Multiple Return Values
What if we want to store values in a mapping, so for every token address requested, the latest price is returned. Currently, Chainlink only returns a single value, but it also returns the completed request ID, which allows us to setup a temporary allocation for the returned value.
Here’s an example for how to achieve a storage mapping in your contract:
mapping(bytes32 => uint256) public currentTokensPrice;mapping(bytes32 => bytes32) internal receipts;// Store request ID for use laterfunction requestTokenPrice(address _oracle, bytes32 _jobId, string memory _hash) public { Chainlink.Request memory req = buildChainlinkRequest(_jobId, address(this), this.fulfillTokenPrice.selector); req.add(“extPath”, concat(“market/tokens/prices/”, _hash, “/latest”)); req.add(“path”, “payload.0.priceUSD”); req.addInt(“times”, 100); receipts[sendChainlinkRequestTo(_oracle, req, ORACLE_PAYMENT)] = stringToBytes32(_hash); }// Use request ID to transition value to main price mappingfunction fulfillTokenPrice(bytes32 _requestId, uint256 _price) public recordChainlinkFulfillment(_requestId) { bytes32 tokenHash = receipts[_requestId]; delete receipts[_requestId]; currentTokensPrice[tokenHash] = _price; }// Simple getter for retrieving specific latest valuefunction getCurrentPriceByAddress(string memory _hash) public view returns (uint256) { return currentTokensPrice[stringToBytes32(_hash)]; }View a completed code example here →
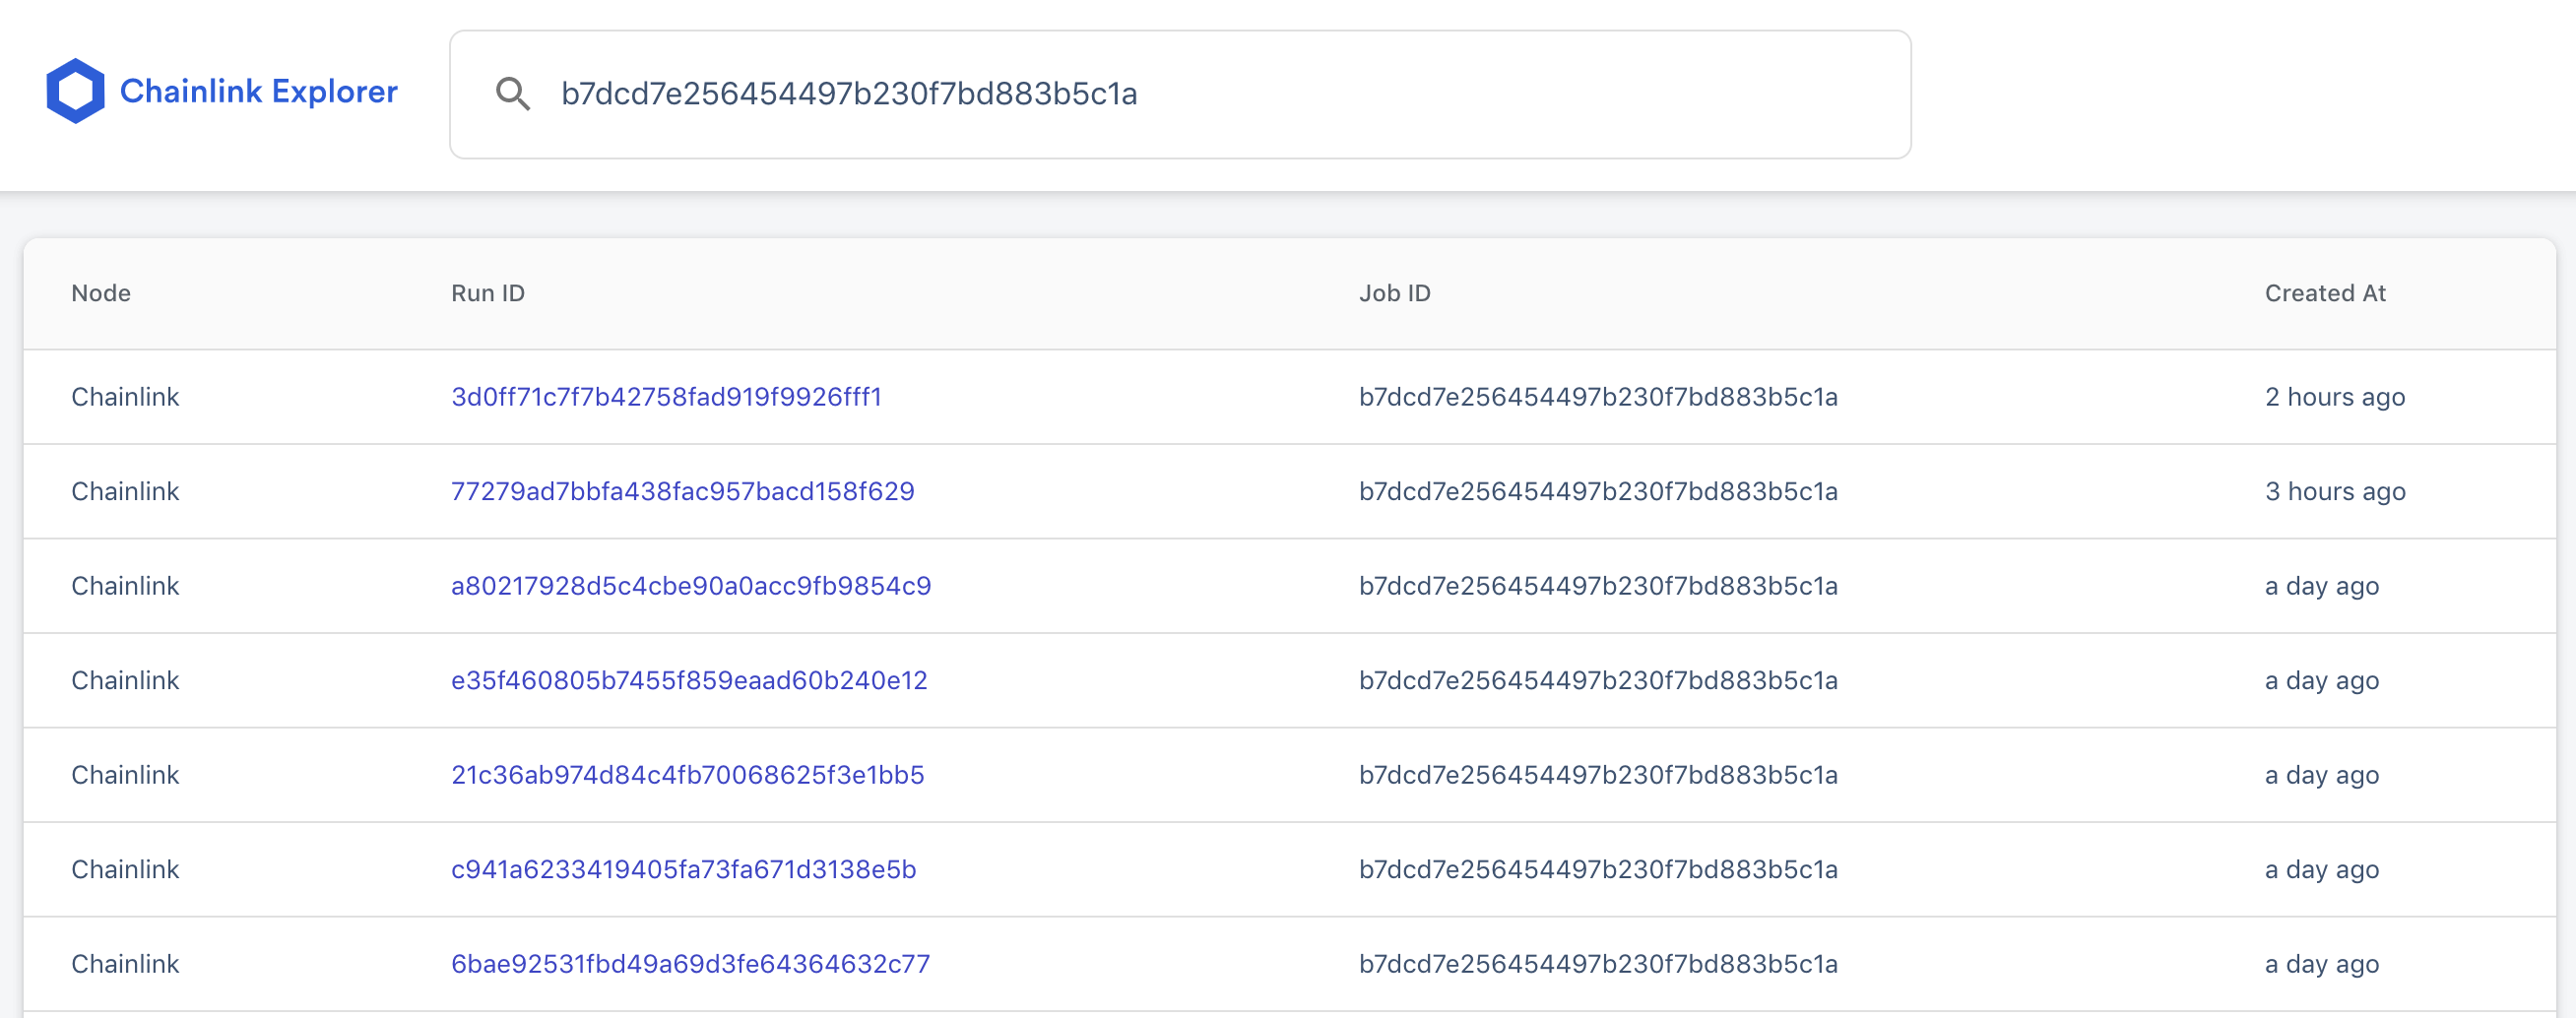
Chainlink’s Ropsten Job Explorer
Job Explorer
Debugging secondary contract calls can be difficult, the chainlink explorer helps show all related data to the jobs context.
You can check the status of all transactions using the chainlink explorer:
Take a look at: https://ropsten.explorer.chain.link/job-runs?search=b7dcd7e256454497b230f7bd883b5c1a
This has a list at the latest jobs requested by smart contracts, and shows all details pertaining to the transaction triggered.
A successful example for a bytes32 job looks like this: https://ropsten.explorer.chain.link/job-runs/2a2aba55-4fc0-45c1-ba29-c4aba75fbdb1
Quick note about jobId’s in remix — they expect a preceding `0x` to the string. For example:
b7dcd7e256454497b230f7bd883b5c1a will be 0xb7dcd7e256454497b230f7bd883b5c1a in the remix input.
Checking Data
Once your transaction has finalized, it’s quite easy to check if the value was updated correctly or not. Let’s check on the previous previous examples and the data that was returned!
Example 1: Price Data
In the price example code, we request USD price for an Ethereum token, we’re going to use 0x Protocol Token, and see what its current day value is:
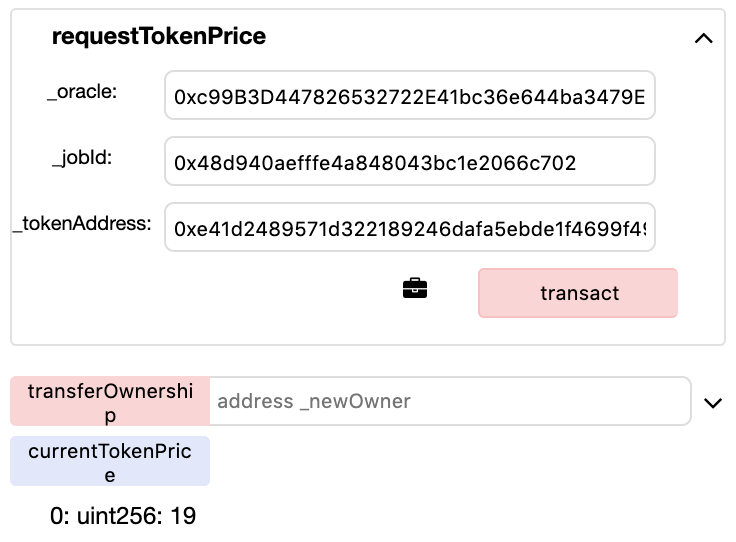
0x Protocol Token — USD Price
Example 2: Gas Price
Obtaining the gas price is as simple as a button click to request the current stored value for our defined variable:
uint256 public currentGasPrice;
Remix knows it is a public value, and creates a getter for us to easily access:
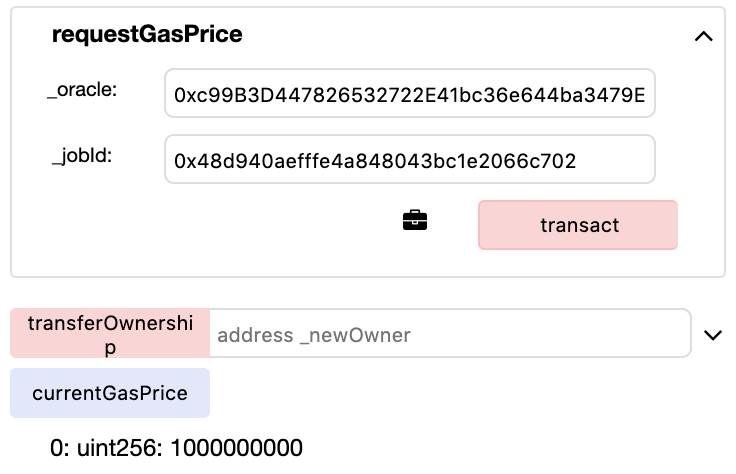
Amberdata Gas Price Predictions
Example 3: Multiple Values
When we stored token prices in a mapping, and also as a mapping with an Array, we also created 2 ways to access the stored values. The first method:
getCurrentPriceByAddress(string memory _hash)
returns the value in non-decimal format:
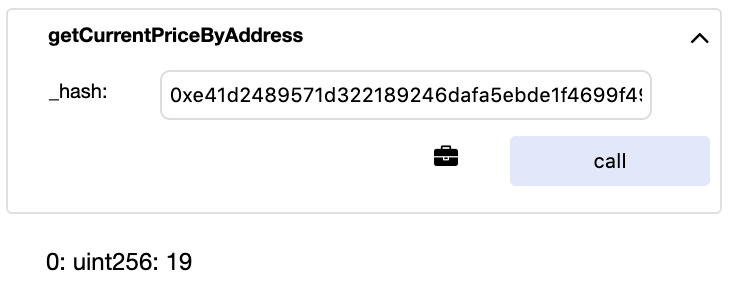
0x Protocol Token — USD Price Example
The second method,
getHistoricalPriceByAddress(string memory _hash)
returns an array of values, which correspond to each value requested:
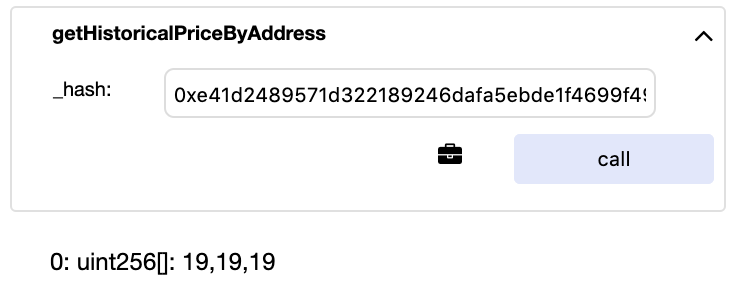
0x Protocol Token — USD Prices AggregationExample
Helper Functions
Create an endpoint url using variables
// Small helper function to help construct function concat(string memory a, string memory b, string memory c) private pure returns (string memory) { return string(abi.encodePacked(a, b, c)); }Using strings in mappings using bytes32
function stringToBytes32(string memory source) internal pure returns (bytes32 result) { bytes memory tempEmptyString = bytes(source); if (tempEmptyString.length == 0) { return 0x0; } assembly { result := mload(add(source, 32)) } }Going Further
There’s a whole lot more waiting for you! Here are a few ways to continue building with Oracles on Ethereum using Chainlink & Amberdata:
Clone the example repository: